Cloudant
Summary
This document covers the information to gather from IBM Cloudant in order to configure a Qarbine data service. The data service will use the Qarbine IBM Cloudant driver. You can define multiple data services that access the same Cloudant endpoint though with varying credentials. Once a data service is defined, you can manage which Qarbine principals have access to it and its associated data. A Qarbine administrator has visibility to all data services.
Cloudant Configuration
Qarbine requires the following information to interact with IBM Cloudant instance:
- IAM API key and
- Cloudant service URL.
To obtain this information sign on to your IBM Account.
Navigate to your database resources.
Click on the desired Cloudant database.

Activate the tab shown below.

Copy the external endpoint.

Paste it into a temporary location.
Confirm the authentication method.

Naviate to the credentials page.

If you have an API key (prerably a reader one) then the following can be skipped.
Click

Enter a name.

Choose the role.

Click

Expand the credential information.

Copy the API key as highlighted below.

Paste it into a temporary location.
For more details on IAM see https://cloud.ibm.com/docs/Cloudant?topic=Cloudant-managing-access-for-cloudant
Qarbine Configuration
Compute Node Preparation
Determine which compute node service endpoint you want to run this data access from. That URL will go into the Data Service’s Compute URL field. Its form is “https://domain:port/dispatch”. A sample is shown below.

The port number corresponds to a named service endpoint configured on the given target host. For example, the primary compute node usually is set to have a ‘main’ service. That service’s configuration is defined in the ˜./qarbine.service/config/service.main.json file. Inside that file the following driver entry is required
"drivers" :[
 . . .
"./driver/ibmCloudantDriver.js"
]
The relevant configuration file name for non primary (main) Qarbine compute nodes is service.NAME.json. Remember to have well formed JSON syntax or a startup error is likely to occur. If you end up adding that entry then restart the service via the general command line syntax
pm2 restart <service>
For example,
pm2 restart main
or simply
pm2 restart all
Data Service Definition
Open the Administration Tool.
Navigate to the Data Services tab.

A data service defines on what compute node a query will run by default along with the means to reach to target data. The latter includes which native driver to use along with settings corresponding to that driver. Multiple Data Sources can reference a single Data Service. The details of any one Data Service are thus maintained in one spot and not spread out all over the place in each Data Source. The latter is a maintenance and support nightmare.
To begin adding a data service click

On the right hand side enter a name and optionally a description.

Set the Compute URL field based on the identified compute node above. Its form is “https://domain:port/dispatch”. A sample is shown below.
Also choose the “IBM_Cloudant” driver.

The server template is the Cloudant URL copied from above. An example is shown below.

You can reference environment variables using the syntax %NAME%. Any strings should be quoted and the key\value pairs separated by commas.
The server options include your API key copied from above. These values are double quoted and separated by a comma as shown below.

The following data options are optional
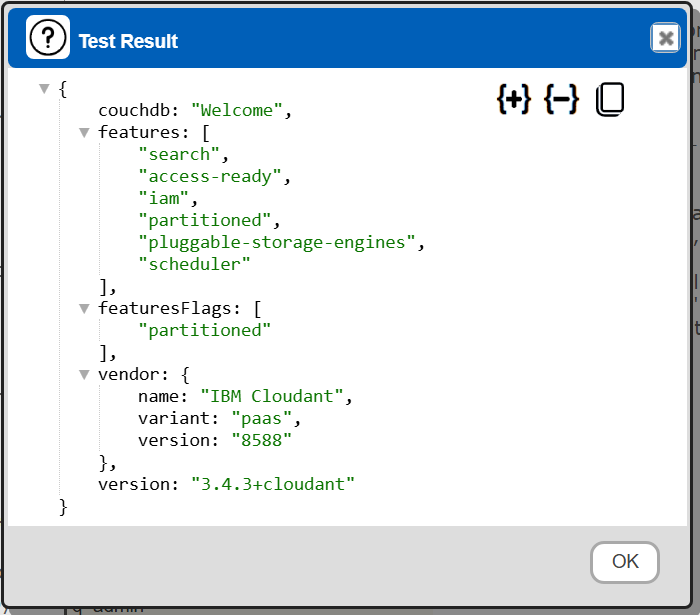
Test your settings by clicking on the toolbar image highlighted below.

The result should be similar to
Save the Data Service by clicking on the image highlighted below.

The data service will be known at the next log on time. Next, see the IBM Cloudant query interaction and any tutorial for information on interacting with IBM Cloudant from Qarbine.
Sample Cloudant Data
The Qarbine Cloudant tutorial uses sample data book oriented data. The associated JSON is located in ˜/qarbine.service/sample/cloudant folder.
It can be loaded using the following steps.
SSH into the Qarbine host.
Navigate to the ˜/qarbine.service/sample/cloudant folder.
cd ~/qarbine.service/sample/cloudant
Edit cloudant.env to have these lines
IAM_API_KEY  = XXX
SERVICE_URL = YYY
DATABASE = ZZZ
The API key must have write privileges to insert the sample book data. See the steps in the first section above though use the “Manager” role to be able to insert the data.
Exit the editor.
Populate the sample book data by running
node populateBooks.js
After importing you can configure a Qarbine data service as described above to interface with whichever IBM Cloudant instance you just populated. The values from cloudant.env can be copied from the Qarbine data service definition.